👋 Welcome
Welcome to the Wind Learning Adventure! Click "Next" to begin your journey.
🌀 Welcome to the World of Wind Energy!
Imagine using the power of moving air to generate clean electricity.
This is exactly what wind energy does. Wind energy is a clean and renewable
source of power. Wind turbines capture the movement of air and convert it
into electricity.
In this workbook, you will explore how wind energy works, why it is useful,
and how it can help shape our energy future.
🌍 Why Study Wind Energy?
Around the world, we face challenges like climate change and limited fossil fuel
resources. This makes renewable energy sources, including wind, more important
than ever.
Studying wind energy helps us understand how we can reduce our carbon footprint
and support a more sustainable way of living. By learning about wind energy, you
will gain knowledge and skills that are important for a sustainable future.
📚 What Will You Learn?
- The Basics of Wind Energy: Learn why different locations have different wind speeds and how this affects energy production.
- Working with Numbers: Learn how to measure wind speed and understand what influences wind power.
- Hands-On Activities: Build your own airfoils (a blade shape with a curved top and flatter bottom) and explore how their shape affects lift and power output.
- Build a Wind Turbine: Carry out measurements, calculations, experiments and much more.
🔍 How to Use This Workbook
This workbook is interactive and hands-on. Each chapter includes explanations,
experiments and exercises to help you understand wind energy.
🌬️ Get Ready to Soar!
By the end of this workbook, you’ll have a solid understanding of wind energy
and its potential to shape a sustainable future.
You’ll be equipped with the knowledge to think critically about energy solutions
and the skills to engage in innovative projects.
Let’s get started on this exciting journey and discover how we can harness
the power of the wind to create a green and stable tomorrow for each of us!
💨 Why wind matters?
Now, let’s dive into wind energy!
Wind energy harnesses the power of the wind to generate electricity, making use of wind turbines to capture the wind’s kinetic energy and convert it into usable power.
Why is wind energy important?
Wind energy is important because it provides clean and renewable electricity. Many countries around the world have suitable wind conditions. In countries such as Ghana, Denmark or India, strong and steady winds help reduce dependence on fossil fuels and support more sustainable energy systems. These examples show how wind energy can contribute to a greener future in many different parts of the world.
✅ Key Advantages of Wind Energy
- Renewable Energy Source: Wind is a free natural resource that is constantly replenished, making it a sustainable source of energy.
- Environmentally Friendly: Wind energy produces no emissions or pollutants, which helps protect the environment.
- Low Operating Costs: After installation, wind turbines require little maintenance, and the wind itself is free.
- Energy Independence: Wind energy allows communities to generate their own electricity and reduce reliance on external energy sources.
- Versatile Applications: Wind turbines can be used in many settings, from large wind farms to small installations that power homes or businesses.
🚀 What’s Next?
In the next chapters, you will learn about energy, wind energy and how moving air can be turned into electricity. You will also learn how to measure wind speed and understand different wind conditions. As part of the practical activities, you will build your own airfoil and a small wind turbine. Through hands-on experiments and clear explanations, you will discover how wind energy works and what its potential is.
Get ready to begin your journey into wind energy.
📘 Key Wind Energy Terms
You can skim or skip this section if you already know these terms.
It turns wind into electricity and feeds it into the power grid.
🧰 Additional Materials for Experiments
These simple tools and materials will help you bring wind energy to life through hands-on experiments.
- Scissors: To cut out the wind rose
- Paper Cup: To serve as a base for the wind rose
- Tape: To secure components
- Straw: Acts as a tower for the wind rose
- Stopwatch: To measure rotation time
- Colorful Marker: To decorate and mark sections
- 30cm Light Thread: Used to suspend the paper clip
- Fan: Creates wind to turn the wind rose
- Paper Clip: Acts as a weight
- Narrow Wooden Stick: Holds the airfoil
- 1 sheet of paper DIN A4 (or 2x A5): Used to build the airfoil
- yarn: Used to build for wake effect
- Hairdryer: Simulates wind for tests
- Multimeter: Measures the performance of your wind turbine
The kit includes most of what you’ll need—just gather a few extras and get ready to explore!
🔌 How to measure the power of wind turbines
To measure the power generated by the wind turbine, the experiments will use a multimeter. It is easy to handle and can measure electrical quantities like voltage, current, and resistance.
Here’s how to get started:
📸 Parts of a Multimeter
🛠️ Important steps to use a multimeter
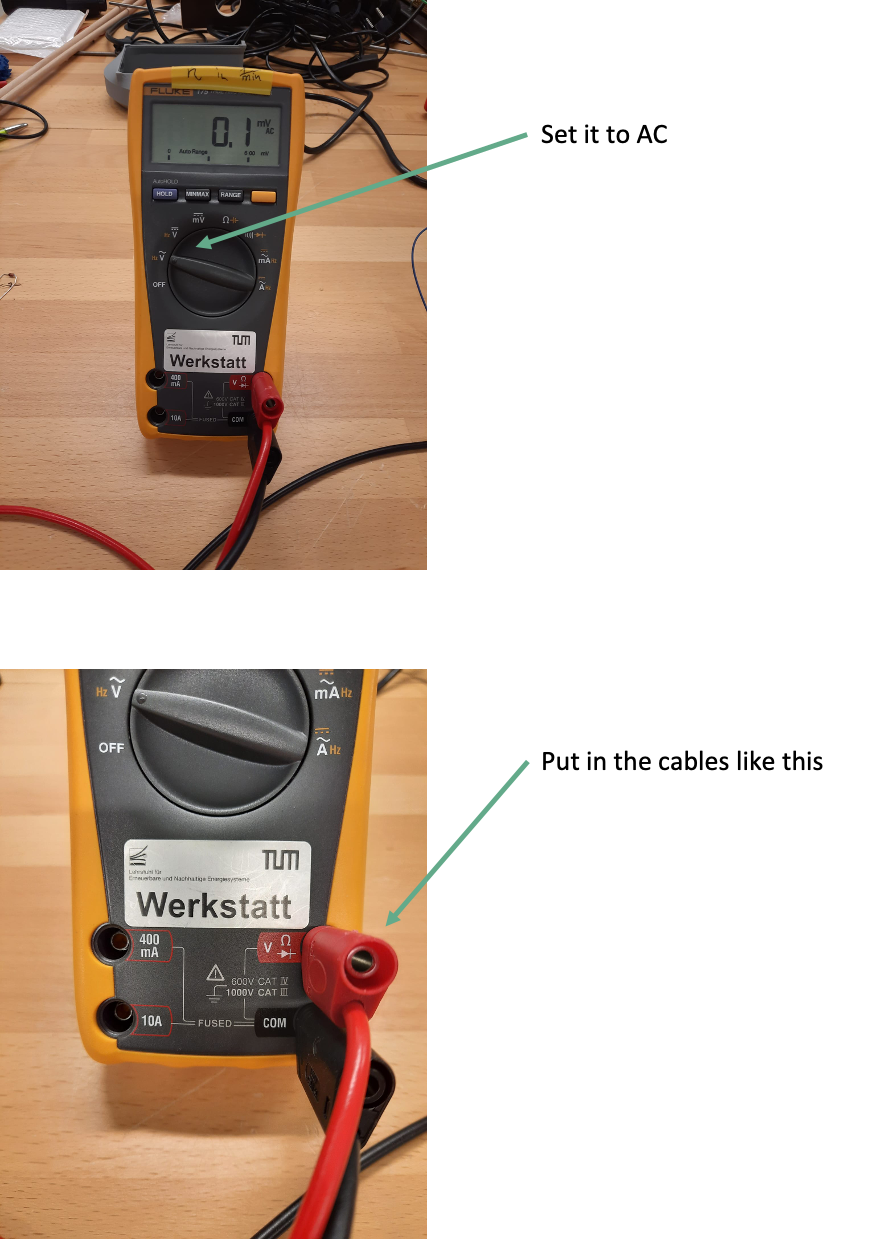
- Turn on the multimeter:Make sure the multimeter is on by turning the dial
- Select the Measurement Type:
-
- Voltage (V): To measure voltage, turn the dial to “V” with a straight line (for DC voltage) or a wavy line (for AC voltage).
Additional information:
- Current (A): To measure current, turn the dial to “A” with the corresponding symbol. Choose between “mA” (milliamps) and “A” (amps) depending on the expected current. We usually just use mA!
- Resistance (Ω): To measure resistance, turn the dial to the “Ω” symbol.
-
- Set the Range: Start with the highest setting to avoid damage.
- Connect the Probes:
- Plug black probe into COM port.
- Plug red probe into the appropriate port:
- For voltage and resistance measurements, use “VΩmA”.
- For measuring high currents, use “10A”.
- For current measurements, use “VΩmA” or “10A” depending on the current.
- Take the Measurement:
- Voltage: Hold the metal tips of the probes against the two points where you want to measure the voltage. Make sure to observe the correct polarity (positive and negative).
- Current: Insert the multimeter into the circuit by breaking the circuit and connecting the multimeter in between so that the current flows through the multimeter.
- Resistance: Hold the metal tips of the probes against the two ends of the component or connection where you want to measure resistance.
- Read the Result: Look at the screen and note the value and unit (V, A, mA, Ω).
- Turn Off the Multimeter: Rotate the dial to OFF.
⚠️ Safety First!
- Never measure voltage when set to current or resistance!
- Start with the highest range setting for safety.
- “Hands off!” Avoid touching probe tips directly—this ensures accuracy and protects you from shock.
Now you’re ready to use your multimeter safely and effectively—happy measuring! ⚡
Chapter 1 – Wind basics
Learn about energy, wind energy and the wind atlas.
In this chapter, we will find out about the following basics:
- Energy in general
- Renewable and Non-Renewable Energy Sources
- Characteristics of wind
- Wind energy
- Wind-rich locations
- How to use the wind atlas
- Different perspectives on implementing wind energy
🎯 Learning Objectives
- In this chapter, you will:
- Understand the basics of wind energy: Gain a clear understanding of wind energy and how wind is used to generate electricity.
- Know the differences of renewable and non-renewable energy sources: Be able to allocate different energy sources correctly.
- Explore key factors affecting wind speed and power: Learn about factors such as wind speed, altitude, location and environmental conditions that influence wind energy production.
- Analyze different wind energy sources: Evaluate the differences between mountains, open plains, coastal regions and offshore areas in terms of wind energy potential.
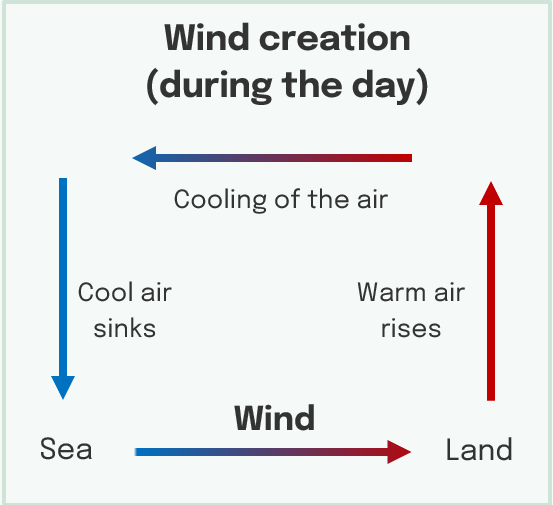
- Understand the mechanism of wind: Gain insight into the dynamics of sea breeze vs. land breeze and how these mechanisms affect wind power.
- Explore offshore wind energy: Learn about offshore wind turbines and their advantages in using strong, consistent ocean winds.
- Understand the concept of the wind atlas: Get to know the wind atlas and which it can be a valuable tool to assess the quality of a region.
- Assess and apply wind energy in real-world contexts: Understand how different groups view wind energy and how to develop solutions that include multiple perspectives.
1.1 Introduction to wind energy
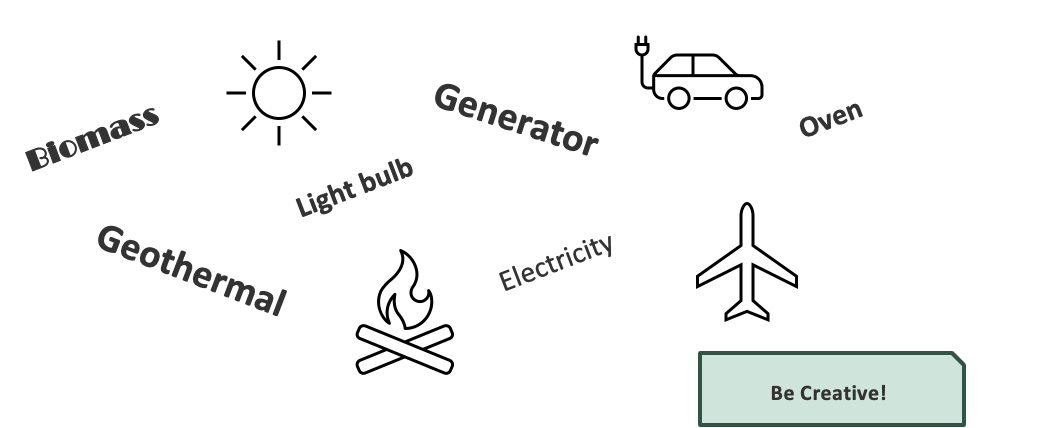
📝Exercise: Task 1 – Energy word chain
- Form 2 groups from the class.
- Someone starts with the first letter of their last name and says an energy-related word, such as an energy source, an energy-using device, or any energy term.
- Look at the examples:
- M: Microwave
- S: Solar panel
- T: Turbine
- Go around the circle; everyone takes a turn. The last letter of the previous word becomes the first letter of the next energy word.
- The game ends when no one can find a new energy word
✅ Good to know about energy
Energy is what makes things move and change.
- It is the power to do work, which means it allows objects and living things to move, act, or make something happen.
- For example, the energy from food helps your body move, like when you run or play.
Energy comes in two main types:
- Kinetic energy: Energy of moving things (like a bike speeding down a hill).
- Potential energy: Stored energy (like a bike resting at the top of a hill).
There are also other kinds of energy, like:
- Heat energy (from fire or sun)
- Electric energy (in plugs and batteries)
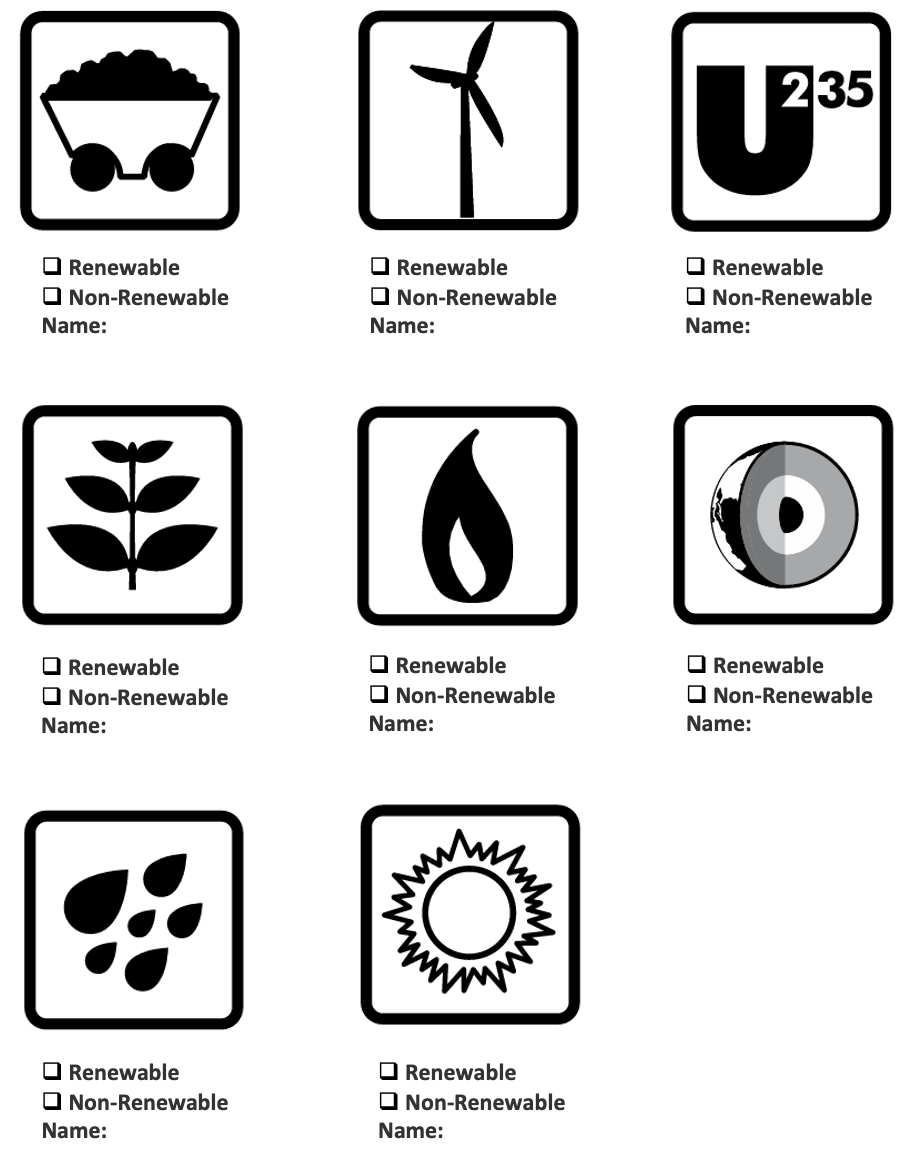
📝Exercise:Task 2 – Renewable and non-renewable energy sources
- Form a group of 2–4 students.
- Look at the pictures on the next side and decide, which of them are renewable energy sources and which are non-renewable / conservative energy sources! Tick the right box in the downloaded workbook.
- Think about: do you know how they all are named?
- Try it on your own first, then discuss it in your group.
✅ Good to know about wind and wind energy:
-
- Wind energy is moving air in the atmosphere.
- Wind energy is the energy created by the movement of the wind.
- Wind energy is a renewable energy source.
- Wind energy can be transformed to electricity, but only when there is enough wind.
- Wind is created when air heats up unevenly in different places due to sunlight. Land warms up faster than water.
1.2 Windy places
📝 Exercise: Task 1 – Wind level in different locations
Places with strong winds are good for producing energy, while places with little wind are not.

📝Exercise: Task 2 – Evaluating wind locations
Choose one place from Task 1 and explain why it is good or bad for wind energy.
Hints: Consider wind strength, open space, height, and obstacles like buildings or trees.
✅ Good to know about wind energy locations
- Regions with strong winds are especially suitable for generating electricity with wind turbines.
- Good places for wind energy are open and very windy areas.
↪Examples: high places, open fields, or coastal regions - Bad places for wind energy are areas with little or no wind.
↪Examples: valleys cities, or places with many buildings and trees.
1.3 Global wind atlas
📝 Exercise: Task 1 – Wind data website
- Split the class into groups of 4–5 students.
- Visit the website below (you can use the QR Code).
- Select “Countries And Regions” on the left-hand side and choose two countries that differ in climate or location- Ghana and Germany – and one more of your choice.
- On the right-hand side, make sure the height is set to 100m.
- Compare the countries by their average power density (W/m²) and wind speed (m/s).
https://globalwindatlas.info/en/

📝Exercise: Task 2 – Interpreting your numbers
Interpret your comparison of Ghana and Germany from Task 1. What does this tell you about each country’s potential for generating wind energy?
✅ Good to know about wind conditions
- The potential for harnessing wind energy varies around the world – in some countries, the wind is strong and frequent, while in others it is weak and infrequent.
- Higher wind speed and power density mean better conditions for generating electricity from wind.
1.4 Opinions on wind energy
📝 Exercise: Task – Wind energy role play
- Split the class into groups of 4–5 students.
- Each group represents a person who might be affected by a wind energy project and receives one of the following roles:
- Local farmer: Worried about land use and noise from turbines.
- Government official: Focused on promoting renewable energy.
- Engineer: Explains how wind turbines work and key technical challenges.
- Student: Curious about how wind energy affects jobs, the environment and future opportunities.
- Environmentalist (optional): Advocates for clean energy and nature care.
- Scenario: “A new wind farm is planned near a coastal village. It will produce electricity for nearby towns but may also affect the local community and environment.”
- Write down arguments for your role below and discuss them afterwards.
- The goal is to discuss the benefits and challenges of wind energy while considering all perspectives!
✅ Good to know about different perspectives
Wind energy has advantages and disadvantages.
- It can produce clean electricity, but it also affects landscapes, nature, and local communities.
Different groups care about different things
- Some think about jobs or money, others about nature, technology, or daily life.
There is no single “right” answer.
- Good decisions often need balance – between energy needs, environmental protection, and local interests.
Chapter 2 – Measuring and working with wind speed
Learn about wind speed, power and their impact on energy generation.
In this chapter, you will find out about the following:
- Measurement of wind speed
- Work done by wind
- Concepts of wind turbines
- Effects of wind conditions on energy generation
🎯 Learning Objectives
In this chapter you will:
- Understand the importance of measuring wind speed: Learn why wind speed is a crucial factor in generating energy and how it directly affects the efficiency of electricity production.
- Build and use a basic anemometer: Discover how an anemometer works and practice measuring wind speed in different environments to understand real-world conditions.
- Explore the concept of wind performing work: Conduct experiments to see how wind can perform work and identify factors that influence how efficiently energy is generated.
- Analyze the effects of turbulence and storm conditions: Learn how obstacles, turbulences, and other environmental conditions affect wind flow and energy generation.
- Understand the role of turbines and gearboxes: Learn how wind turbines convert wind into electricity and how gearboxes optimize the process for maximum output.
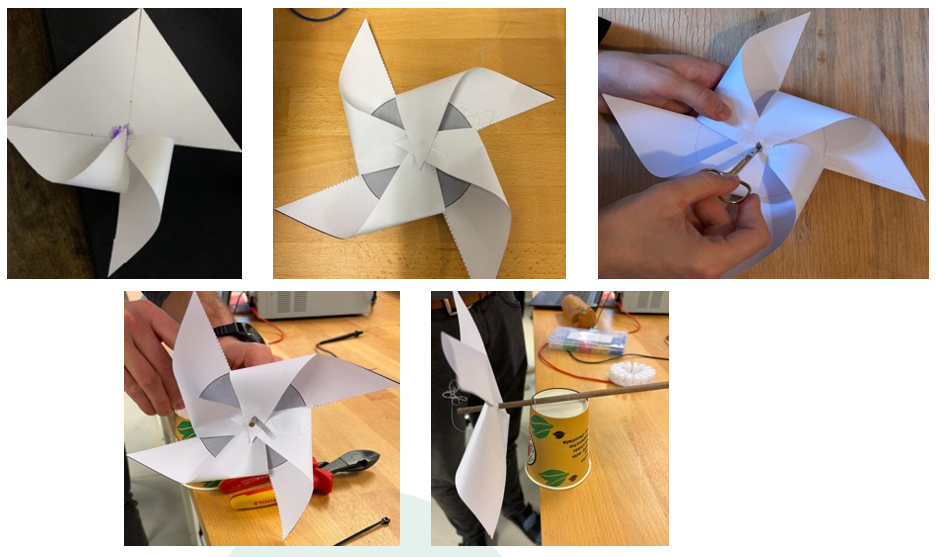
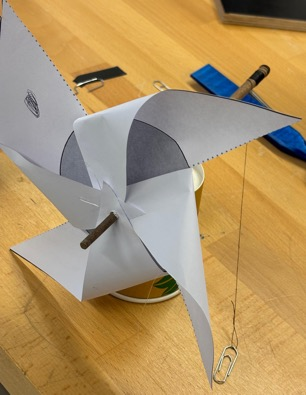
2.1 Making a paper windrose
In this chapter you will play some games to learn about the basics of wind, energy and wind energy!
🧪 Experiment
Materials you will need for the experiment:
- Printed Windrose Model
- Scissors
- Paper cup
- Tape
- Thin long wooden stick (Alternative: Long Pencil)
- Two paper clips
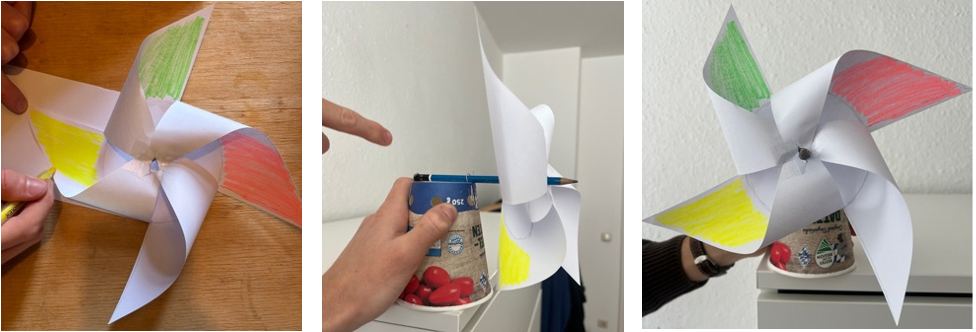
Follow these steps to make your own wind rose
2.2 Measuring Wind Speed
🧪 Experiment
Materials you will need for the experiment:
- Paper wind rose (from the previous experiment)
- Colorful marker (bonus: different colors)
- Stopwatch
- Fan
Follow these steps to measure wind speed using the wind rose:
📝 Exercise: Task 1 – Fill in the table
📝 Exercise: Task 2 – Wind speed and rotational movement
How does the wind speed relate to the number of rotations?
📝 Exercise: Task 3 – Investigating maximum rotation
At which speed did the compass rose rotate the fastest? Explain why?
✅ Good to know about wind speed effects:
- Anemometers are tools to measure wind speed by counting rotations. They help engineers choose the best locations for wind turbines.
- Changes in wind speed are caused by factors such as location, height, obstacles, turbulence, and environmental conditions.
- Faster winds mean more energy potential. Open areas or high altitudes are best for wind energy projects.
2.3 Wind can do work
🧪 Experiment
Materials you will need for the experiment:
- Paper wind rose (from the previous experiment)
- 30 cm light thread
- Tape
- Fan
- Stopwatch
- Paper clip
Follow these steps to conduct the experiment:
📝 Exercise: Task 1 – Fill in the table
📝 Exercise: Task 2 – Lifting at different wind speeds
How does wind speed (low, medium, high) affect the speed at which the wind rose lifts the weights?
📝 Exercise: Task 3 – Testing different loads
How does the weight of the load affect the windrose’s ability to lift it at different wind speeds?
📝 Exercise: Task 4 – Connecting with the real-world situation
How can this experiment relate to real wind turbines?
Reflective question
Wind power is not always available at the same level. Can a modern society really rely on such a fluctuating energy source? How should we deal with these fluctuations?
✅ Good to know about wind doing work:
- Wind can perform mechanical work.
- Different wind conditions affect how well a wind turbine can operate.
- Changing the weight influences the amount of force needed for lifting.
- Real wind turbines also rely on wind conditions and design choices to work efficiently.
🧠 Test your knowledge on generators and gearboxes
Task 1 – Fill-in-the-blank text
- A generator converts __________ (mechanical/thermal/chemical) energy into electrical energy.
- Wind turbines naturally spin __________ (quickly/slowly/moderately), but generators need a __________ (lower/higher/consistent) speed to produce electricity.
- The __________ (rotor/gearbox/stator) in a wind turbine increases the rotational speed of the shaft to match the generator’s requirements.
- The process of spinning a generator transforms __________ (kinetic/heat/light) energy into electricity.
- Gearboxes work by adjusting __________ and __________ (force & mass/speed & torque/direction & rotation) in the system.
Task 2 – Evaluate and correct the statements
Write whether the given statements are true or false. Correct the statements if they are false.
- Wind turbines spin at a high speed naturally, making them directly compatible with generators.
- A generator converts electrical energy into mechanical energy.
- The rotor is the stationary part of a generator.
- Gearboxes are used in wind turbines to adjust the rotational speed and torque.
- The energy conversion process in wind turbines involves transforming kinetic energy into mechanical energy and then into electrical energy.
Task 3 – Matching terms
Match the terms in Column A to their corresponding definitions or functions in Column B.

Chapter 3 – Airfoils
In this chapter, we will find out about the following basics:
- Constructing an airfoil
- How wind from the right direction creates lift
- The importance of blade shape
- The Bernoulli principle
- Factors that influence wind turbine performance
🎯 Learning Objectives
In this chapter you will:
- Understand the basics of airfoils and lift: How blade shape creates lift by changing airflow and pressure.
- Connect the Bernoulli Principle to turbines: Understand how the same principle that helps airplanes fly also drives wind turbine blades.
- Hands-on experiment with paper: See how a simple paper experiment demonstrates the principle of lift – blowing air over paper makes it rise due to pressure differences.
- Evaluate blade design for maximum efficiency: Recognize why the airfoil shape is essential for effective wind energy generation.
- Consider factors influencing wind turbine performance: Examine how wind speed, air density, and blade angle affect rotation and power output.
3.1 Let’s make an airfoil!
In this chapter, you will find out how to build an airfoil and how to experiment with it.
Materials you will need for the experiment:
- Narrow wooden stick
- Adhesive tape
- 1 sheet of paper DIN A4 (or 2x DIN A5)
- Hairdryer
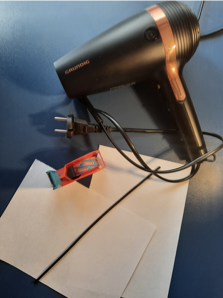
Follow these steps to conduct the experiment
For steps 1 and 2 look at the following pictures:
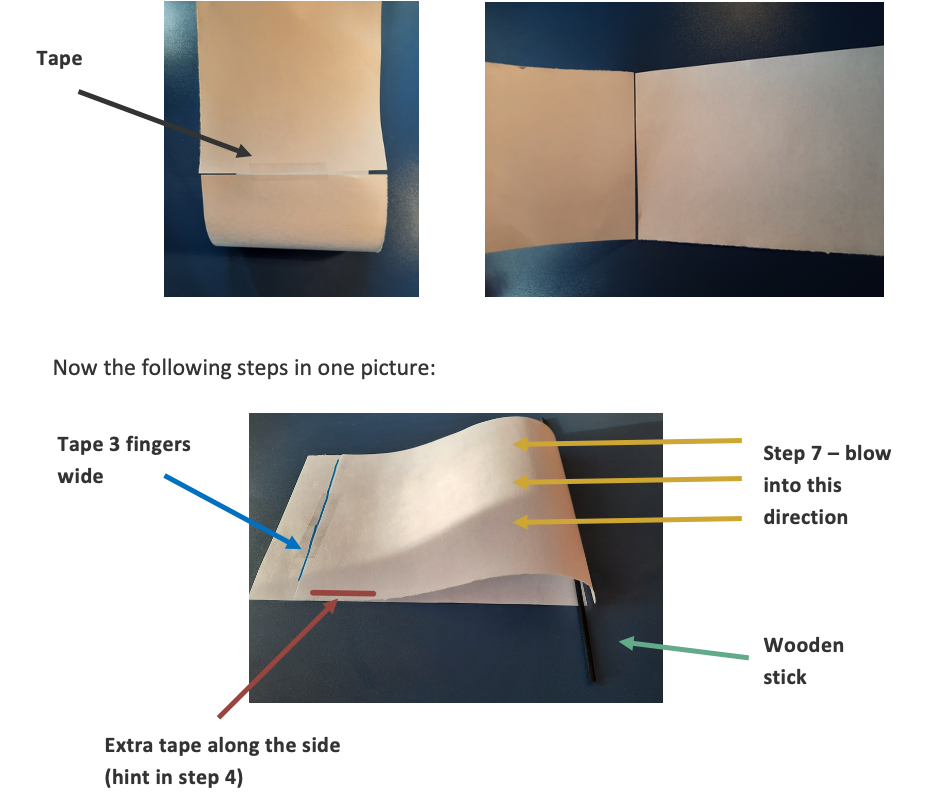
Exercise:
📝 Exercise:Task 1 – Experiment Observation
What happens if you blow over the top surface, holding the wooden stick in both of your hands?
📝 Exercise:Task 2 – Finding Reasons
What could be the reason for that observation?
📝 Exercise:Task 3 – Determine the best shape of a blade
Based on your observations so far, what shape should the blades have?
📝 Exercise:Task 4 – Identifying key influences on turbine performance
What factors could influence the output power of wind turbines?
3.2 Making flow visible
In this chapter, you will find out about flow separation.
Materials you will need for the experiment:
- Paper wings (from the previous experiment)
- Adhesive tape
- Thread or thin yarn (approx. 5cm long, recommendation: darning yarn)
- Hairdryer
Follow these steps to conduct the experiment
📝 Exercise:Task 1 – Observations
What do you observe about the threads when you hold the wooden stick firmly with both hands and blow over the surface?
📝 Exercise: Task 2 – Explaining the reasons
The wing only lifts when the threads lie smoothly against the wing. Why do these observations occur? Explain your assumption.
Physics behind It
This demonstrates flow separation. The air can no longer follow the curvature, vortices form, and lift collapses. This is the reason why the pitch angle must be adjusted in strong winds to protect or brake the system.
Reflective Question: Airfoils
In this lesson, you learned that the shape of airfoils affects airflow, lift, performance, and safety, and that small design changes can have significant impacts.
Should engineers working on safety-critical technology rely mainly on proven designs, or should they test new, potentially riskier designs? Show the advantages and disadvantages of proven designs and new ones? And who should take responsibility if an innovation fails?
✅ Good to know about airfoils
- Airfoils usually have a curved upper surface and a flatter lower surface.
- When air flows over them, the pressure on the upper surface is lower than on the lower surface. This pressure difference generates lift.
- This shows how wind can set rotor blades in motion and thus generate energy.
- The performance of wind turbines is influenced by several factors.
- Important factors include wind speed and direction, the size and shape of the rotor blades, the height of the turbine, air resistance, and the efficiency of the mechanical components.
- Flow behavior:
- Laminar flow: When the wing is correctly oriented toward the hair dryer, it lifts as in the first experiment. In this case, the threads should lie smoothly against the paper (see image 3).
- Flow separation: Because the hair dryer blows air more toward the sides in the third step, the threads are deflected sideways and flutter. At the same time, the wing sinks. The air can no longer follow the curvature of the wing, vortices form, and lift collapses. This is the reason why the pitch angle must be adjusted in wind turbines.
- Only with laminar flow can the wing lift. If the flow becomes too turbulent, the wing loses lift. In that case, the wind turbine cannot efficiently convert wind energy into electrical energy.
Chapter 4 – Experiments with a Wind Turbine
In this chapter, we will find out about the following:
- Wind direction and turbine alignment
- Angle of attack
- Role of the tail fin
- Effect of changing wind directions
- Effect of different blade pitches and lengths
- Effect of varying the number of blades
- Maximum Power Point (MPP)
🎯 Learning Objectives
At the end of this chapter, you will be able to:
- Understand the importance of wind direction: How aligning a wind turbine to the wind direction increases performance and how the angle of attack affects efficiency.
- Explain the role of the tail fin: How the tail fin helps the turbine to automatically align with the wind for maximum performance.
- Describe blade pitch adjustment: How changing the blade angle affects the cross-sectional area exposed to the wind and influences power generation.
- Evaluate the effects of blade length: How longer blades can capture more wind and generate more power, but can also become too heavy and impact performance.
- Analyze blade weight: Understand how blade weight influences the minimum wind speed needed for a turbine to start operating.
- Compare the effects of blade count: Why three blades often provide the best balance between performance and stability.
- Understand the limitations of single-blade designs: How using only one blade results in unbalanced rotation and increased stress on the turbine structure.
- Understand the concept of maximum power point (MPP) in wind turbines: How turbine performance can be optimized by adjusting wind direction, blade pitch, and design.
4.1 How to Measure the Power of Wind Turbines
To measure the power generated by the wind turbine, the experiments will use a multimeter. It is easy to handle and can measure electrical quantities like voltage, current, and resistance. For our experiments we stick to the unit of voltage to measure energy. Why that?
What is power?
Power is the amount of energy that something can produce or use in a certain amount of time. For wind turbines, power means the energy they create by turning wind into electricity.
How do we measure power?
Wind turbines generate electricity, and we need a way to measure how much power they produce. Normally, power is measured in units like watts (W). However, in some cases, we can use voltage to estimate power.
What is voltage?
Voltage is like the “pressure” in an electrical circuit. It tells us how strongly the electricity is being pushed through wires.
- Higher voltage means more electrical energy is moving.
- Lower voltage means less energy is being transferred.
Why is voltage a good proxy for power?
- Voltage and power are closely related in wind turbines.
- When the wind turbine produces more power, the voltage often increases.
- You can think of it like water flowing in a pipe: higher water pressure (voltage) means more water (power) flows.
In summary
Voltage is a helpful way to measure the power output of wind turbines because it directly reflects how much electrical energy is being produced at any moment.
4.2 How to Use a Multimeter
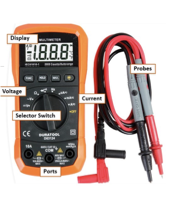
What is a multimeter?
A multimeter is a handy tool that can measure electrical quantities like voltage, current and resistance. Here’s a simple guide on how to use it, along with an explanation of its key parts and steps. For our experiments we stick to the unit of voltage to measure energy.
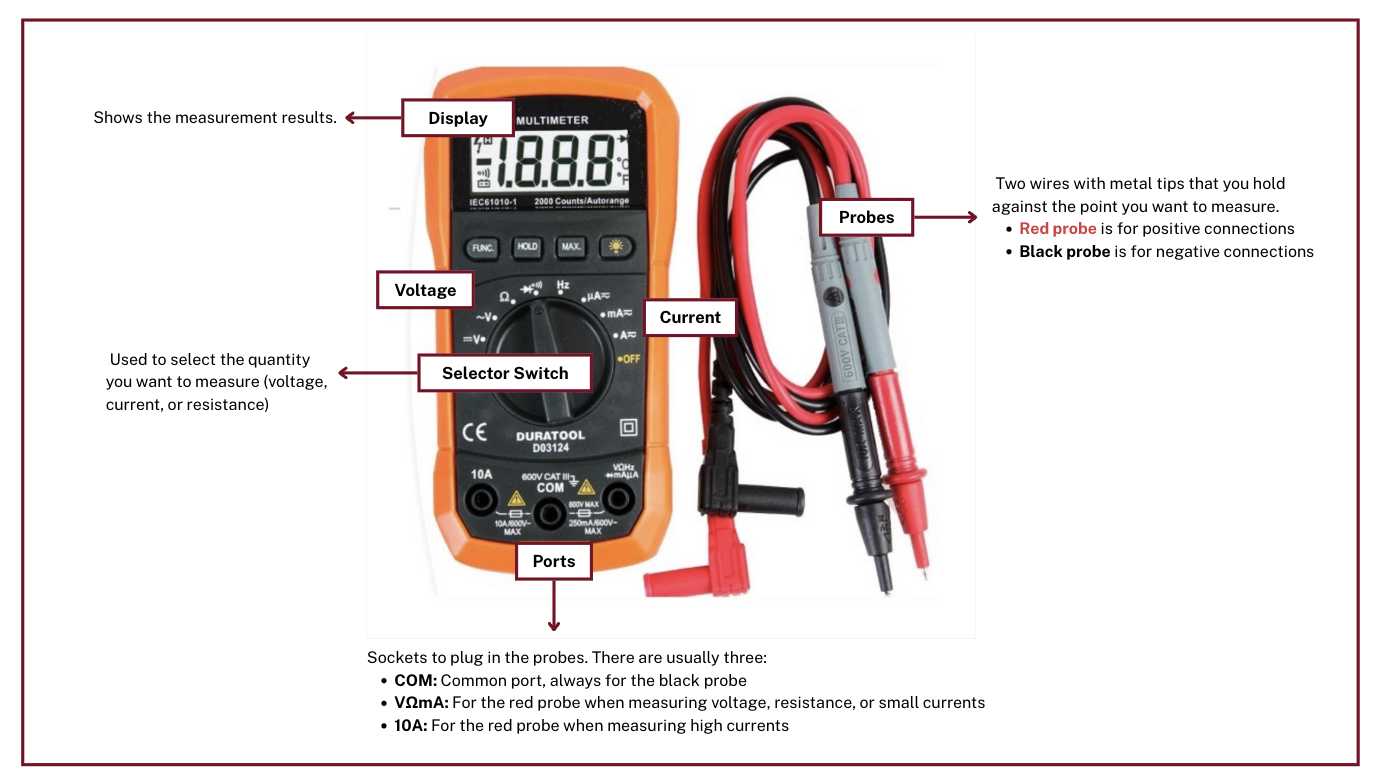
Parts of a multimeter
- Display: Shows the measurement results.
- Dial/Selector Switch: Used to select the quantity you want to measure (voltage, current, or resistance).
- Probes: Two wires with metal tips that you hold against the point you want to measure. The red probe is usually for positive connections, and the black probe is for negative connections.
- Ports: Sockets where you plug in the probes. There are usually three:
- COM: Common port, always for the black probe.
- VΩmA: For the red probe when measuring voltage, resistance, or small currents.
- 10A: For the red probe when measuring high currents.
Important Steps to Use a Multimeter
- Turn on the multimeter: Make sure the multimeter is on by turning the dial.
- Select the measurement type:
- Voltage (V): To measure voltage, turn the dial to “V” with a straight line (for DC voltage) or a wavy line (for AC voltage).
- Additional information:
- Current (A): To measure current, turn the dial to “A” with the corresponding symbol. Choose between “mA” (milliamps) and “A” (amps) depending on the expected current — we usually just use mA!
- Resistance (Ω): To measure resistance, turn the dial to the “Ω” symbol.
4.3 Changing Direction of Wind
📝 Exercise: Task 1 – Find the right wind direction
Look at the pictures below and draw the arrows of the wind direction so that the objects move as fast or as well as possible!
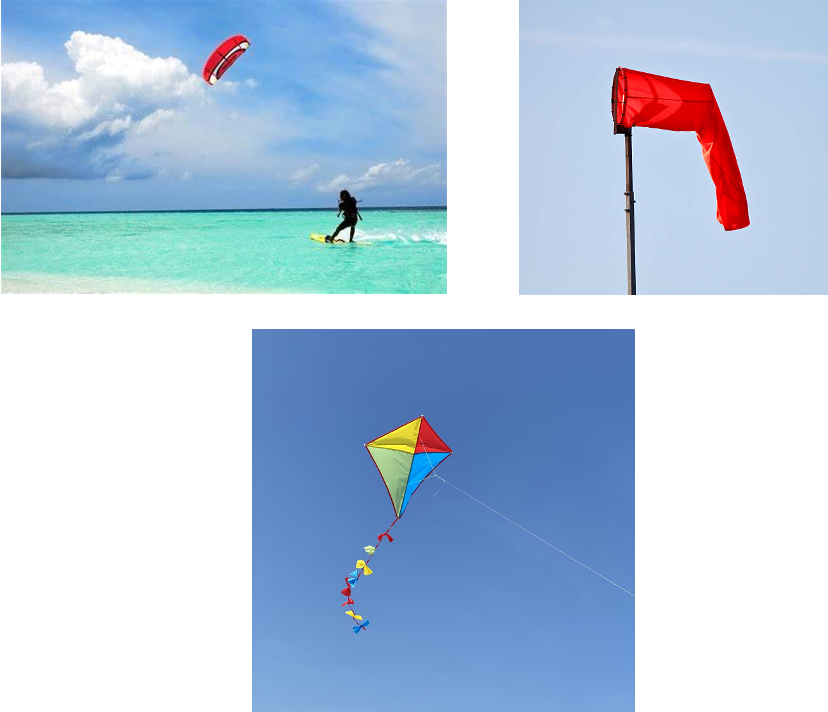
📝 Exercise: Task 2 – Find similarities
What do they all have in common?
4.4 How to Use the Wind Turbine Kit
It’s time for you to gain hands-on experience with our wind turbine experiment kit! The kit replicates the basic functions of a real wind turbine and helps you to explore how it works and which factors influence its efficiency.
The picture below shows the different parts of the wind turbine and how to assemble it. Take a look before you start!
If you have any questions, don’t hesitate to ask your teacher for help.
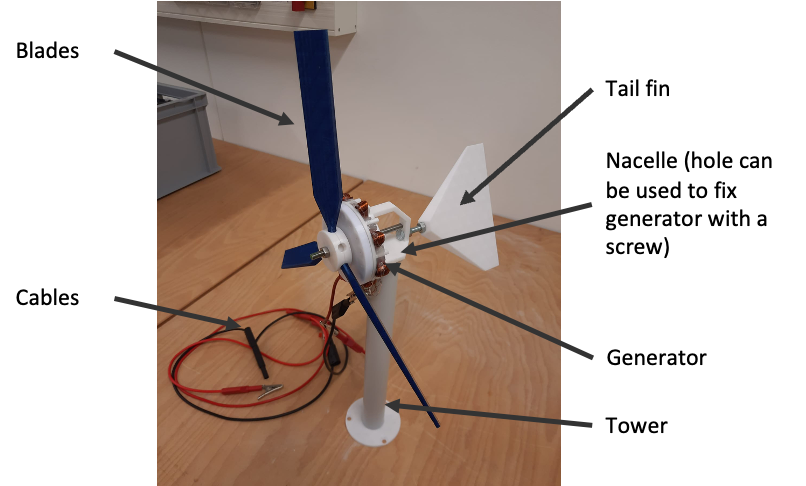
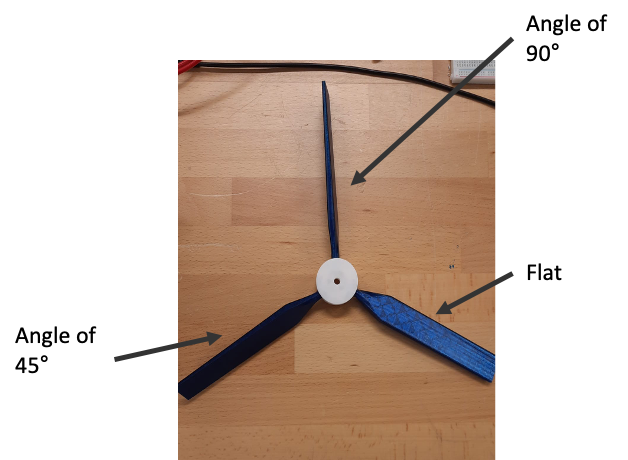
You can adjust the blade angles, as shown in the picture. For most experiments, we’ll use the blades in a flat position—unless stated otherwise.
🧪 Experiment
Material you will need for the experiment:
- Wind set with 3 blades, medium size
- Fan
- Multimeter
Follow these steps to conduct the experiment
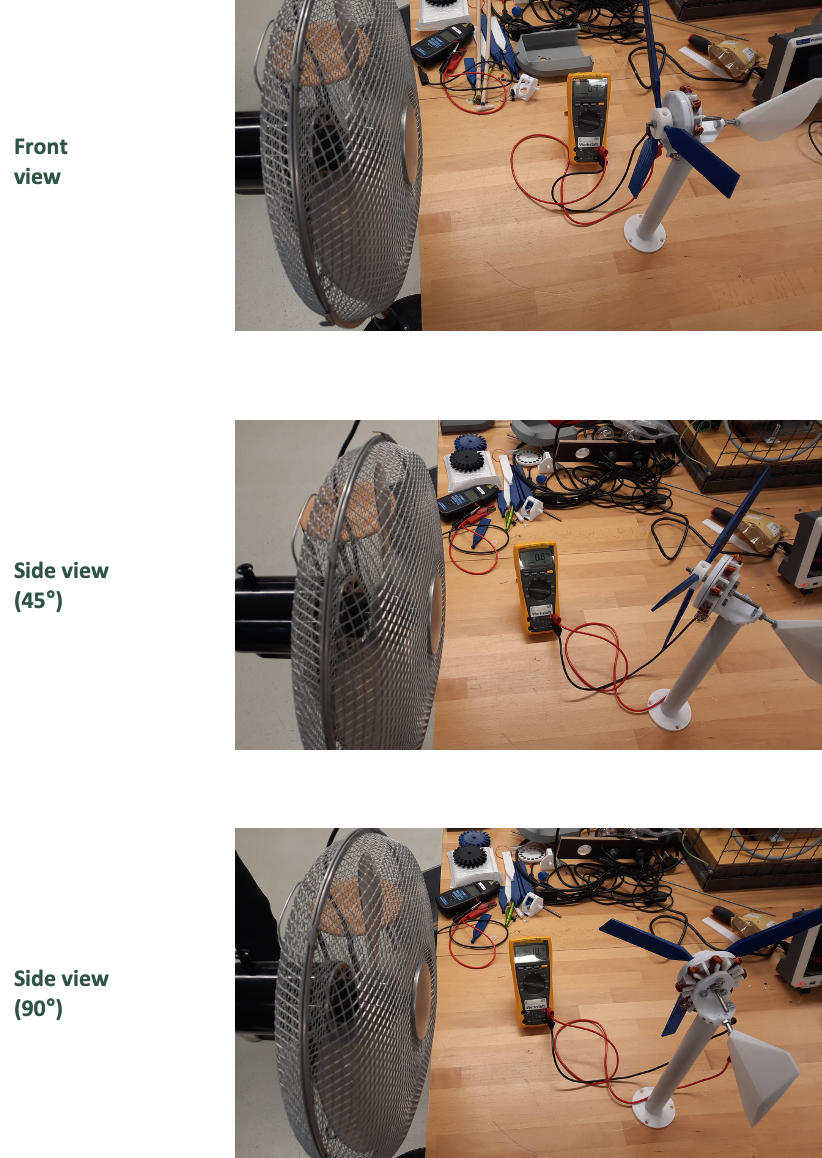
Step 3: Measure the voltage with the multimeter at low, medium, and high fan speeds for the following orientations (you may give an initial push):
- Front view
- Turn it to the side (45°)
- Turn it to the side (90°)
Look at the pictures below to see what the different angles mean in execution.
📝 Exercise: Task 3 – Fill in the table
Report your answers?
📝 Exercise: Task 4 – Experiment Observation
What did you observe? What does that mean?
4.5 Angle of Attack
📝 Exercise: Task 1 – Partner work
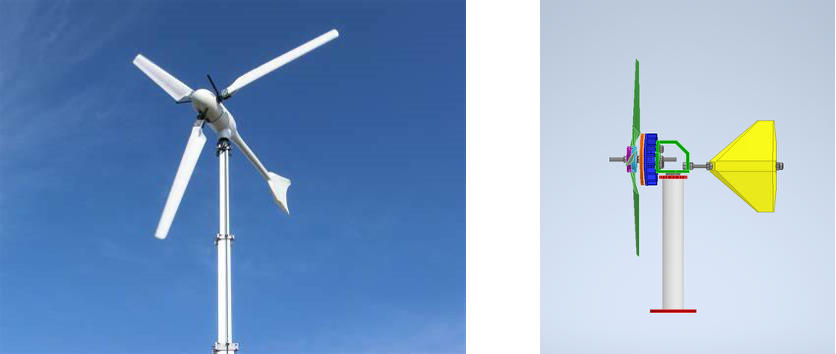
Since we now know that the wind turbine must face directly into the wind and the wind changes throughout the day, the wind turbine must adjust its direction.
How can we align a wind turbine so that it faces directly into the wind?
- Look at the pictures below and think of a part that could be a solution.
- Talk to your neighbor and think about your ideas.
- Write down your solution.
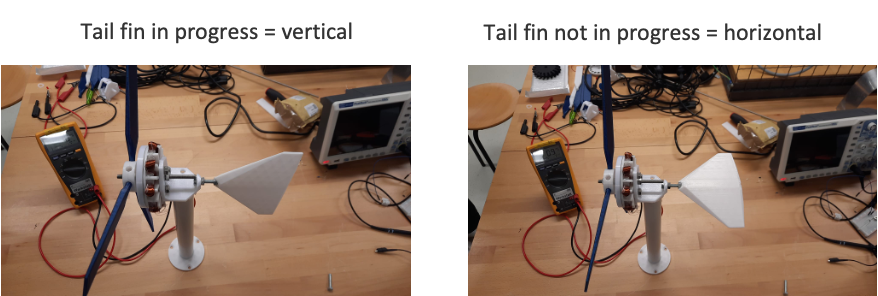
4.6 Using a Tail Fin
🧪 Experiment
Material you will need for the experiment:
- Wind set with 3 blades, medium size
- Fan
Follow these steps to conduct the experiment
📝 Exercise: Task 1 – Fill in the table
📝 Exercise: Task 2 – Use of a tail fin
Why do we need a functioning tail fin?
📝 Exercise: Task 3 – What’s your opinion?
Why do you think the turbine is able to move with the tail fin?#
✅ Good to know about wind turbine performance
- Wind direction affects how much power a wind turbine can generate.
- Therefore, the angle of attack is an important concept to consider.
- The design of the turbine also includes features that help it align with the wind.
- Features like a functioning tail fin allow the turbine to adjust and respond to changes in wind direction, which can influence efficiency.
🧠 Let’s Test Your Knowledge!
Task 1 – Fill-in-the-blank text
- The __________ (direct/side) wind exerts more force on the wind turbine.
- To make the wind turbine face the wind, we attach a __________ (tail fin/rotor blade).
- The __________ (turbine/nacelle) rotates to face the wind direction.
- The nacelle moves to reduce __________ (airflow/drag) on the tail fin.
- The __________ (air pressure/angle of attack) influences how efficiently the turbine uses the wind.
- _______ (Direct/Side) wind has more power to move wind turbines.
Task 2 – Tick the right answer
Are the following statements true or false?
- Direct wind exerts more force on a wind turbine than side wind.
- The tail fin is attached so that the wind turbine aligns itself with the wind.
- The nacelle rotates to reduce the lateral drag on the tail fin.
- A wind turbine produces the most energy when it is aligned directly into the wind.
- The tail fin helps the wind turbine respond to changes in wind direction.
4.7 Changing Blade Pitch
🧪 Experiment
Material you will need for the experiment:
- Wind kit with 3 blades, medium size
- Fan
- Multimeter
Follow these steps to conduct the experiment
Step 4: Measure the voltage with the multimeter for the following blade angles (you may give an initial push):
- Angle of 90°
- Angle of 45°
- Flat
✅ Good to know about the blade pitchs
- Adjusting the blade pitch influences how the wind moves them.
- By using the right angle, more energy can be converted.
- A flat-angled blade has the highest efficiency.
4.8 Changing Blade Length
🧪 Experiment
Materials you will need for the experiment:
- Wind set with 3 blades
- Fan
- Multimeter
Follow these steps to conduct the experiment
📝 Exercise: Task 1 – Fill in the table
📝 Exercise: Task 2 – Experiment Observation
What do you observe? How does the blade length affect the wind set’s turning speed?
✅ Good to know about blade length
- Blade lengths affect directly how much wind is captured by the wind turbine.
- Longer rotor blades capture more wind, but they are heavier and place greater loads on the turbine.
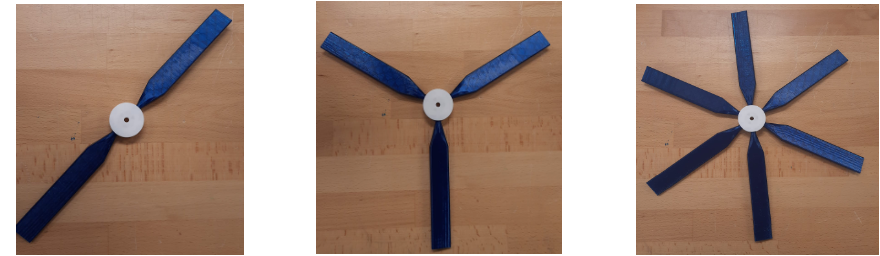
4.9 Changing Number of Blades
🧪 Experiment
Material you will need for the experiment:
- Wind set with 2, 3, 6 blades (medium size)
- Fan
- Multimeter
Follow these steps to conduct the experiment
Step 4: Measure the voltage with the multimeter for the following number of blades (you may give a first push):
- Two blades
- Three blades
- Six blades
📝 Exercise:Task 1 – Fill in the table
📝 Exercise:Task 2 – Experiment Observation
What differences do you notice in voltage output between different blade configurations?
📝 Exercise:Task 3 – Stability Check
What happens to the stability when the number of blades increases?
📝 Exercise:Task 4 – Pro vs. Con
What are the advantages and disadvantages of using turbines with more blades in real-world wind farms?
✅ Good to know about changing number of blades
- The number of rotor blades affects several properties of a wind turbine, such as:
- rotational speed,
- smoothness of operation,
- air resistance and voltage output.
- A higher number of rotor blades increases smooth operation but can reduce efficiency.
- In practice, three rotor blades usually represent the best compromise.
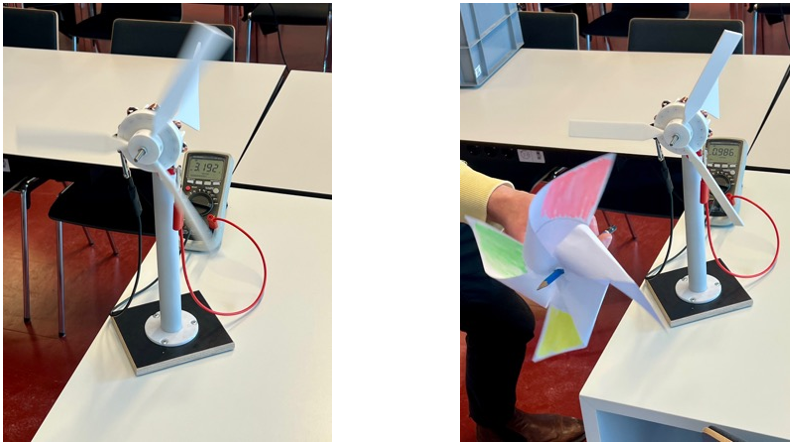
4.10 Wake Effect
🧪 Experiment
Materials you will need for the experiment:
- Paper wind vane (from the previous experiment)
- Fan
- Wind turbine set
- Multimeter
Follow these steps to conduct the experiment
📝 Exercise:Task 1 – Fill in the table
Enter your measurement results in the table.
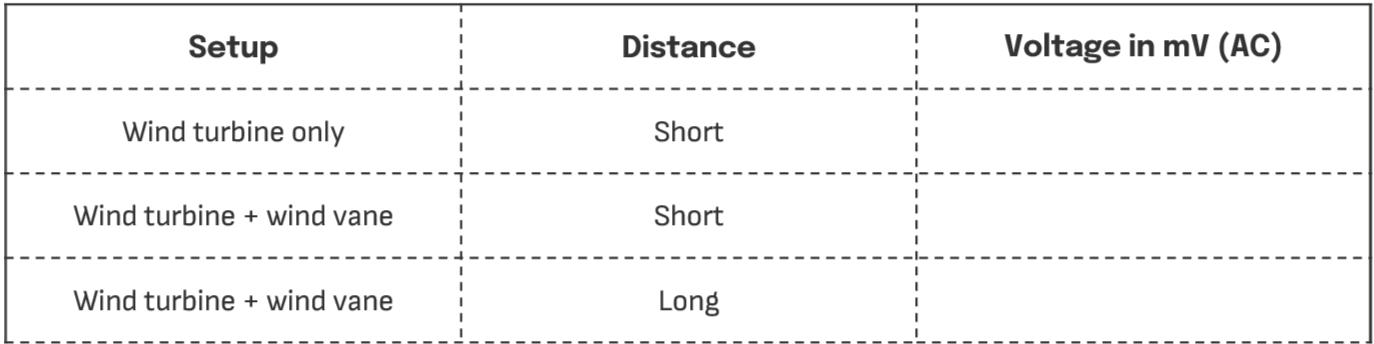
📝 Exercise:Task 2 – Observation
What differences do you observe in the voltage output between the different experimental setups?
Physics behind It
The first turbine extracts kinetic energy from the wind and creates turbulence behind it. This is called the wake effect.
It explains why large distances between turbines are necessary in wind farms (onshore and offshore) to ensure efficient operation.
Reflective Question:
If you were asked to evaluate a wind turbine based solely on classroom experiments, what important information would be missing from a real-life application?
Why are laboratory experiments alone insufficient for fully assessing a wind turbine?
Final Reflective Question
When wind energy is expanded, many interests meet: cheap electricity, climate protection, nature conservation and the expectations of local people. Who should be the final decision maker and why (politicians, companies, scientists or the public)?
How would you guide this discussion?
🧠 Let’s test your knowledge on Chapter 4!
Task 1 – Fill-in-the-blank text
- The direction of wind has __________ (no/an) influence on the generation of electricity.
- To make the wind turbine face the wind, we attach a __________ (tail fin/rotor blade).
- The pitch of the blade is optimal when it is ___________ (angled/flat).
- The _________ (shorter/longer) the blade is, the more energy the turbine can capture.
- If the rotor blades are very heavy, the power output may __________ (drop/increase).
- To generate the optimal power output with a wind turbine and have a balanced wind turbine system, the number of blades should be ________ (one/two/three/six).
- The turbine turns in an asymmetrical way if the number of blades is ________ (one/two/three/six).
Task 2 – Remember me!
Write down at least three new things you have learned so far that you do not want to forget!
Task 3 – Fill-in-the-blank text
- The Maximum Power Point (MPP) is the point where a wind turbine generates the _________ (lowest/highest/moderate) power output under given wind conditions.
- To optimize energy capture, the blade angle (pitch) should be ________ (adjusted/fixed) according to wind speed.
- Yaw control helps the turbine ________ (stay fixed/rotate towards/rotate away from) the wind direction for maximum efficiency.
- Wind turbines use ________ (sensors/batteries/magnets) to monitor wind speed and adjust for MPP in real time.
- Increasing rotor speed beyond MPP results in ________ (optimal performance/energy loss/increased efficiency).
Task 4 – Evaluate and correct the statements
Are the following statements true or false? Correct the statements if they are false.
- MPP ensures a wind turbine always operates at its maximum efficiency.
- Blade pitch control is unnecessary for maintaining MPP.
- Offshore wind farms use advanced control systems to optimize MPP in real-time.
- Wind turbines naturally adjust to MPP without any external systems.
- Dynamic wind conditions do not affect the Maximum Power Point.
Task 5 – Matching terms
Match the terms in Column A to their corresponding definitions or functions in Column B.

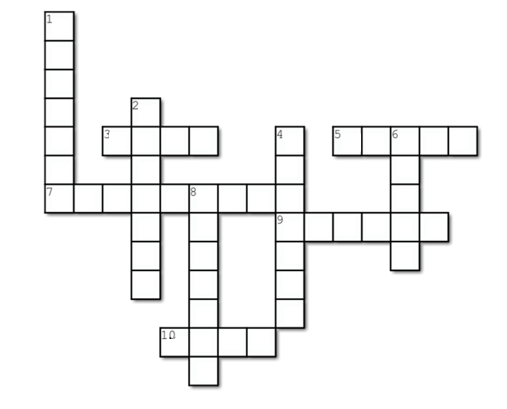
🎉 Playtime – Crossword Puzzle
Congratulations on completing this course on wind energy!
You’ve learned about how wind turbines work, the science behind wind power, and its role in renewable energy.
Now you can test your knowledge with a fun wind energy crossword puzzle!
This puzzle challenges you with key terms related to wind energy—let’s see how many you can get right! Get ready to have fun and reinforce what you’ve learned.
You find the crossword puzzle on page 77 with the responding questions!